Uninstallation Troubleshooting - Manual Uninstall of the Verigio Driver
This article applies to the following products:
Verigio software products are installed with the accompanying network filter driver. When
the installation of a software product becomes damaged, a manual uninstall of the network
filter driver may be necessary. The steps below outline how to uninstall the Verigio
driver manually.
During the installation of a software product, the network filter driver and all related
driver files are placed in the Drivers subfolder of the installation folder.
- CheckVerigioTrust.exe
- DriverInstaller.exe
- verigio_win10.inf
- verigio_win10_x64.cat
- verigio_win10_x86.cat
- verigio_win7.inf
- verigio_win7_x64.cat
- verigio_win7_x64.sys
- verigio_win7_x86.cat
- verigio_win7_x86.sys
- verigio_x64.mof
- verigio_x64.sys
- verigio_x64_uninstall.mof
- verigio_x86.mof
- verigio_x86.sys
- verigio_x86_uninstall.mof
There are three methods for manually uninstalling the driver.
Method 1: Uninstall via command-line program
Open the command-line prompt and navigate to the Drivers subfolder of the software
product's installation folder. Then, run the following command:
DriverInstaller.exe /ua
Method 2: Uninstall via Windows command-line utility pnputil.exe
Open the command-line prompt and navigate to the Drivers subfolder of the software
product's installation folder. Then, run the following command:
pnputil.exe /delete-driver verigio_win10.inf /uninstall /force
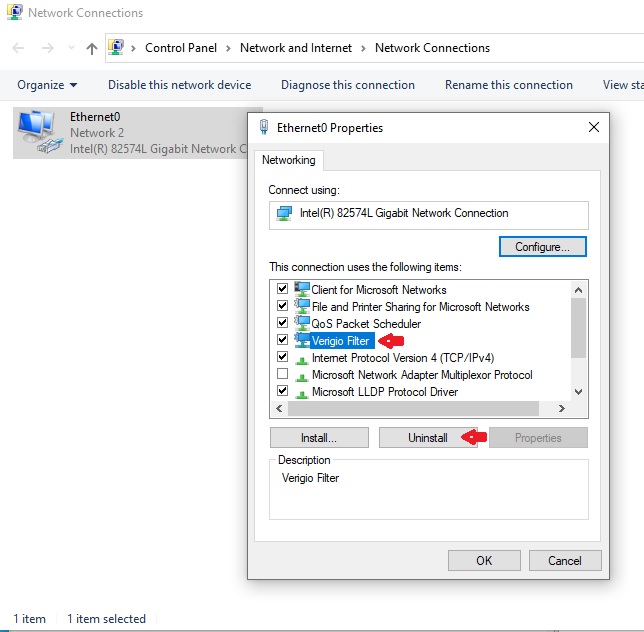
Method 3: Uninstall via Network Interface Properties
- Launch ncpa.cpl from the command line. The Network Connections window
will appear.
- Right-click on any of the network interfaces to bring up its context menu. Then,
select Properties from the context menu. The Properties window will appear.
- In the Properties window, click to select Verigio Filter from the list.
Then, click the Uninstall button.
Note: The check marks next to the items in the list indicate whether they are enabled
or disabled. The item selection is indicated by a blue background color.
- Close the Properties window.
Last updated: Oct 16, 2025.

 Shopping Cart
